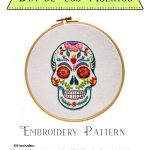
I had this great idea at the end of last year for a fun embroidery project to do with the kids in the makerspace in the fall. I had it all planned out, starting with a lesson on printing with thermofax screens, where I would teach them how to burn a screen and print a skull design on white fabric, then we would have a series of lessons on different embroidery stitches and everyone could embroider a unique day of the dead skull design through the month of October.

I was all set to start working on this when I got back from New Zealand, and we all know what happened next, sigh…
Well, I decided to go ahead and work on it anyways so I’d be ready whenever school resumed. I designed and screen printed a skull on a couple pieces of cotton-linen blend fabric that I had left over from one of my classes at Craft Napa.

Then I drew up an embroidery design and transferred it to my fabric with pencil and started stitching…

What fun! Before I knew it I finished embroidering the skull

and started on another!

After finishing, I showed them to several people who expressed interest in also stitching some day of the dead skulls, so I decided to make kits to sell in my shop.

I have put together 2 kits, because some people may want to stitch more than one skull and don’t need double the paper.

Each kit comes with screen printed skull fabric, and 4 design pages.

This is what comes in the 2-pack.
The design pages have 2 different skull embroidery patterns like the ones I embroidered, and a blank skull next to it for designing your own embroidery pattern

using the accompanying design motif sheet, and inspiration page to get your ideas rolling.


Trace the floral design elements onto the skull by placing the design motif sheet underneath the skull paper. I placed a dotted line down the middle of the blank skull to make it easy to center design elements and also to create a mirrored design by drawing the design on one side of the skull, then fold the paper in half and trace the design onto the other side of the skull. Or you can transfer the design by folding the paper in half with right sides together and burnish the backside of the pencil drawing.

You may need to go over your pencil lines on the paper with a black pen to make sure they are dark enough to be seen through the fabric when transferring your design.
For the eyes, I used a white chalk pencil to draw the flower on the printed black eye socket of the skull.
I decided not to include floss in the kit since so many of us have loads of embroidery floss on hand already, and if not you can always get a large assortment pack of floss on Amazon pretty cheaply. I’d also recommend a size 22 embroidery needle. It has a nice sharp point and large eye for easy threading.
Get your Dia de los Muertos embroidery pattern kit now.
Keep creating,
Judy

ABOUT JUDY
Judy is an artist, explorer, image wrangler, knowledge seeker, instructor, speaker, creative alchemist, and purveyor of inspiration, helping others channel creativity on a daily basis.
4 responses to “New in the shop!”
You are both very creative + FAST!
Hi Ann,
when I get excited about a project, I’m full steam ahead. 😄
What a great project for the summer!
And the Two pack is perfect: I can make One for myself and one for a friend . Keep creating Judy!
Will you be selling a skull thermofax?
Hi Jollyne,
yes, I will keep selling the skull patterns, I’ve almost sold out of what I printed in 1 day, so that shows there’s plenty of interest to keep doing it. I just placed another order for fabric, unfortunately Dharma says orders are taking 19 days to fill, so I wont be able to get kits back in the shop as fast as I’d like to. I think they are really fun to stitch though, I hope people post pics of their finished ones on social media and tag me, I would love to see them all.